Content
-
Interviewing Your Glass Fabricator
-
Glass Countertop Types and Terms
-
Textures for Glass Countertop
-
Glass Countertop Cutting and Polishing
-
Lighting Glass Countertops
-
Metal Support Brackets and Installation Techniques
-
Glass Countertops Cost
-
Installation and Shipping
-
ERRATA: The Dumbest Glass Countertop Ideas on the Internet
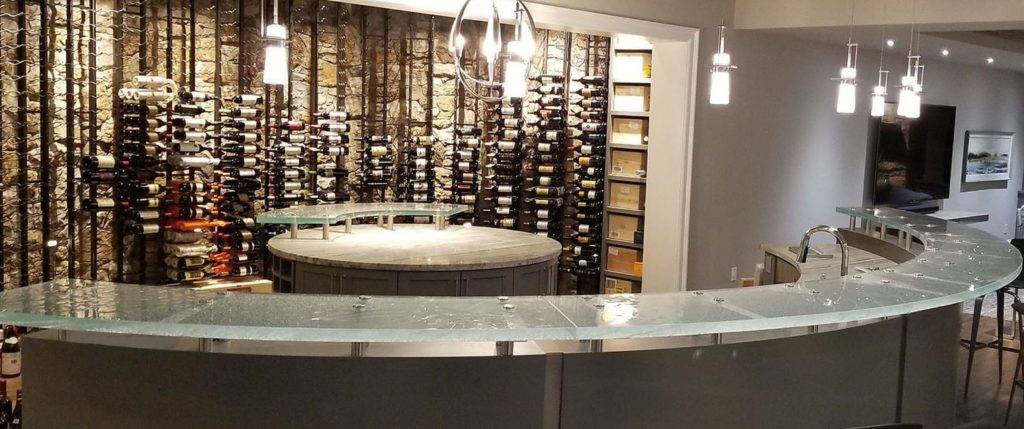
Thick Glass countertops are one of the hottest design trends in Kitchen and Bath remodeling today. No other material enhances the visual beauty of your space like the translucent nature of glass. It offers endless creative possibilities which high-end designers demand when their projects require a luminous focal point.
This buyers guide will help you understand the many decorative options available to make it “POP” in your home.
As a buyer, we recommend you ask lots of questions of your glass fabricator after website visits followed by On-Site tours and first-hand inspection of product quality.
Do your reputation research. Know what you are getting for your money in writing upfront. Here are some good interview questions to start…
Questions for your Glass Countertop Fabricator
- Where are your products Made… In the USA?
- Are they responsive via phone, text and email? Speak with Who will Measure, Design, Fabricate and Install.
- Share your Vision with your Fabricator in Sketches and Photos from e.g. Houzz
- Are your Inputs taken when Designing Glass textures?
- Do they Feel Passionate about their work…or are they just a slab exporter?
- Are they Reputable ?
- Get a written Quote with all options itemized with Installation.
Author Qualifications
This guide was written by Jeff Downing of Downing Designs, a professional design-build-install studio that has installed millions of dollars of custom Glass surfaces. He has an intimate understanding of glass countertop fabrication.
Downing Designs has a truly unique approach where human interaction and creative insight are fluidly aligned to imagine a brighter future for your space. Great things happen (e g. Prototypes) when we cross-pollinate our ideas with others. The result is a functional piece of glass art that has an emotional connection with their clients.
If you Google “Buy Glass Countertops” you will see many keyword-stuffed, ad-driven sites posting misleading statements and very odd glass high bar support ideas. Please enjoy our ERRATA section at the end where we’ve called them out for their misleading statements and expensive glass countertops installed in strange, half-baked ways. Buyer Beware!
Glass Types and Terms
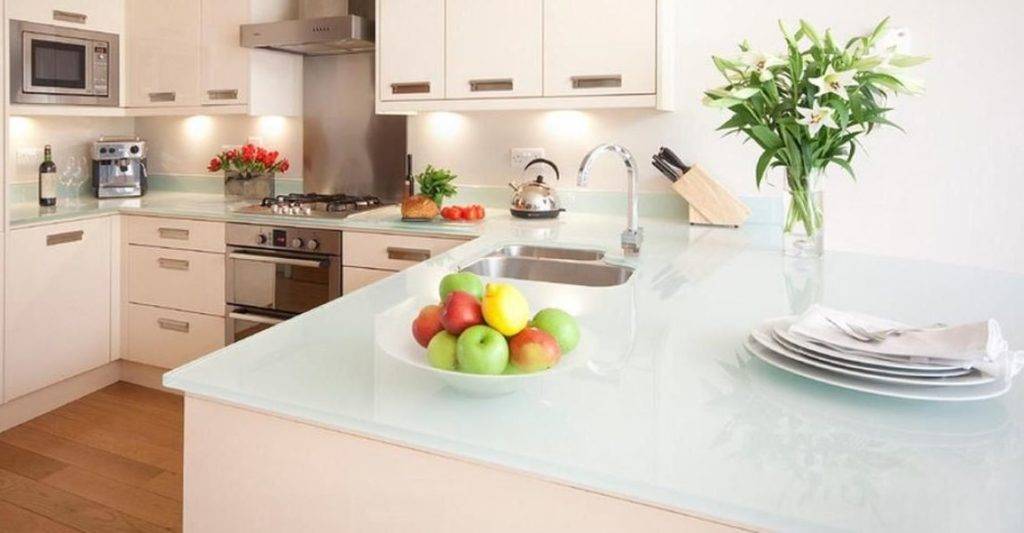
Glass Countertops can be fabricated from a variety of glass. Float Glass is commonly used. Float glass is a flat sheet created by “floating” raw molten glass (a mix of raw material and recycled glass cullet) over a bath of molten tin.
Float Glass glass pieces up to 177” x 127” x ¾” thickness are available and are well suited for flat, back painted countertops and splashbacks.
3/4″ Low iron Glass Backpainted White
- Low-Iron Glass is a Float glass with low amounts of iron which render a light bluish hue. This is critical when viewing the edge, as you will see the color intensity greatly magnified. Low-iron glass is well suited for countertops and backsplashes.
- “Clear” Glass is a Float glass with higher iron content that renders it a greenish hue. The thicker the glass, the deeper the hue. Dont use “Clear” glass if you are back painting the glass as it will tint your final result.
Tempered Glass is created from Float Glass by heating in an oven and then quickly cooling. Tempered glass is about 4x stronger than annealed glass, allowing it to be used for thin glass applications e.g. shower doors, sneeze guards. Tempered glass must have all cuts completed before tempering. Usually, glass that is ¾” or thicker need NOT be tempered for use in bathrooms vanity tops, or kitchen glass counters.
Designer Note: Lighting flat glass with LEDs is a waste of money because it has no texture to create depth.
Slumped Glass is made by placing glass over a mold then thermoforming at ~1300 degrees F in Kilns until the glass “slumps” and to the shape of the mould. Slumping glass over large textured ceramic sand beds creates textured glass Sinks and Glass Backsplashes.
Fused Textured Glass is a process where sheets of float glass are thermoformed over a large ceramic sand bed and fused together ~1450 degrees F and then annealed. The annealing process “heat-strengthens” the fused glass product to almost 2x annealed glass strength. Fused textured glass at 1.5” thick is very strong and is an extremely durable material.
Designer note: 1” thick countertops do not have the visual depth on edge vs 1.5” glass but cost only fractionally less.
Textured glass hides the appearance of fingerprints and minor scratches.
Fused Glass with Colors is created using an inter-layer “paint” of glass frit and enamels and then fired. Vibrant colors are possible.
Glass With Colored Frit Fused in between Layers
Hot glass is the process of gathering and molten glass and twirling it into the artists final vision. Beautiful small artistic glass sinks and pieces can be formed this way. Examples include Dale Chihuly and “Big Wave” Dave Wight.
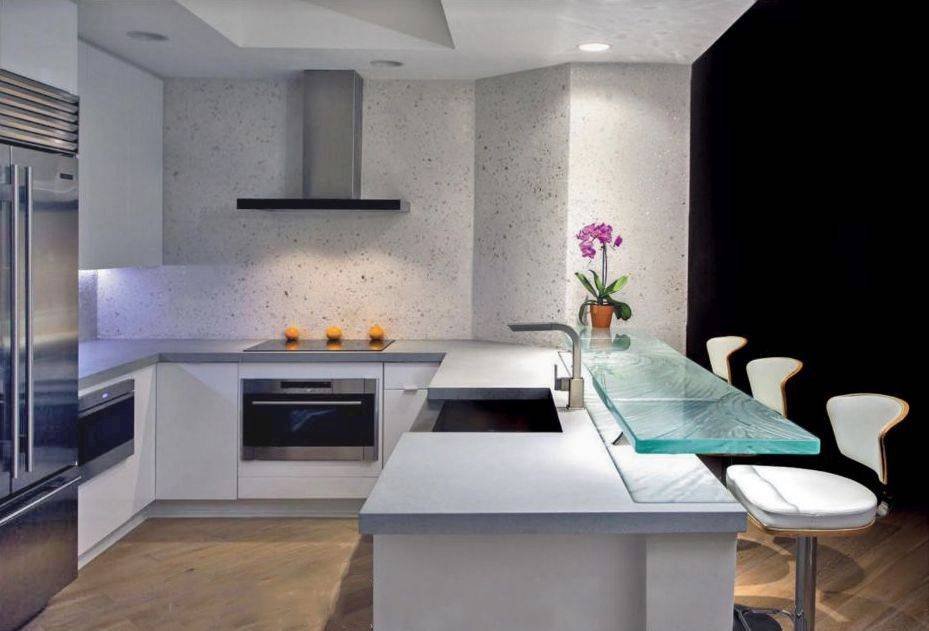
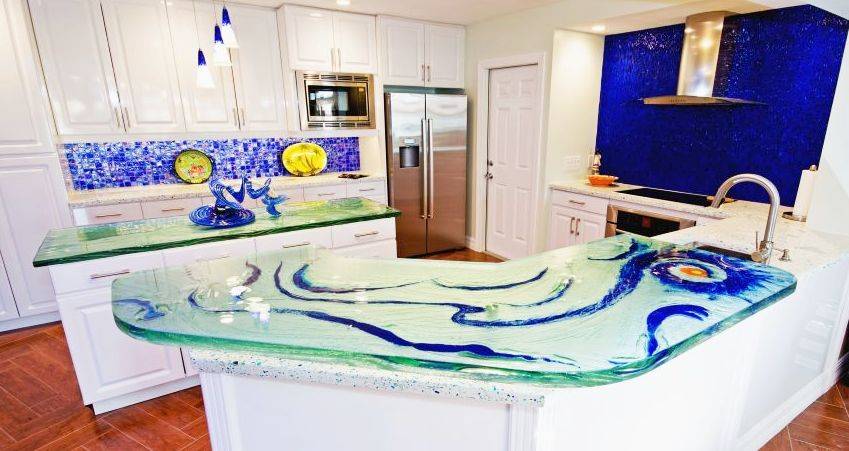
White Glass countertops (aka Nano glass, Crystallized glass) are a fusion of recycled glass and minerals created at 3000 degrees. It is poured, cooled then polished to a very high gloss shine. White glass countertops share a non-porous nature with Glass.
Pure White Glass countertops change the spatial relationship of every room they reside. In fact, they make kitchens and baths appear ~25% larger.
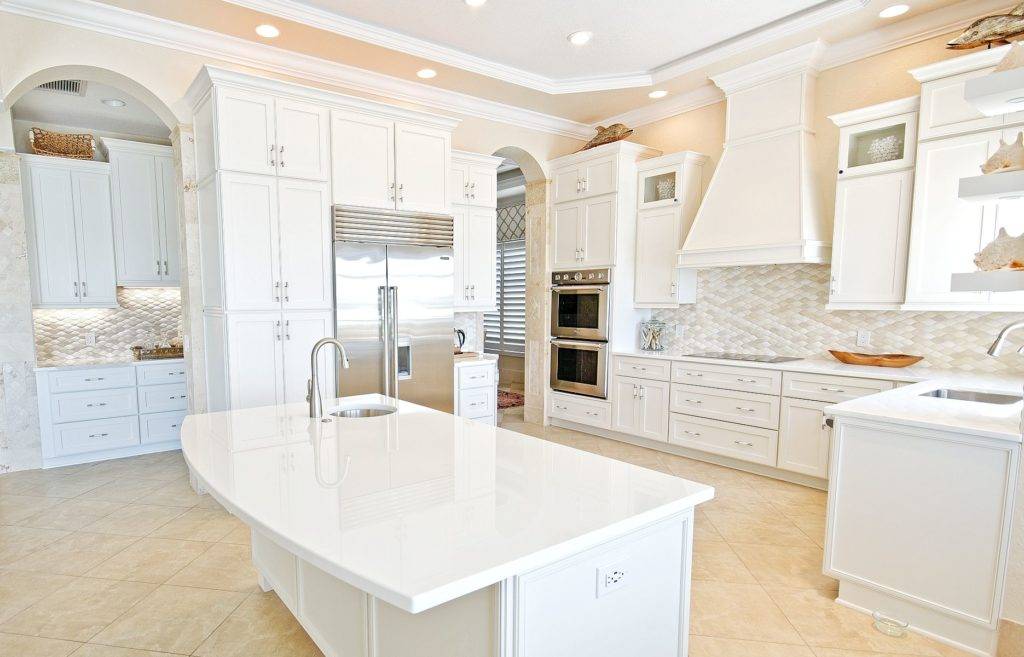
White Glass Countertops in Kitchen
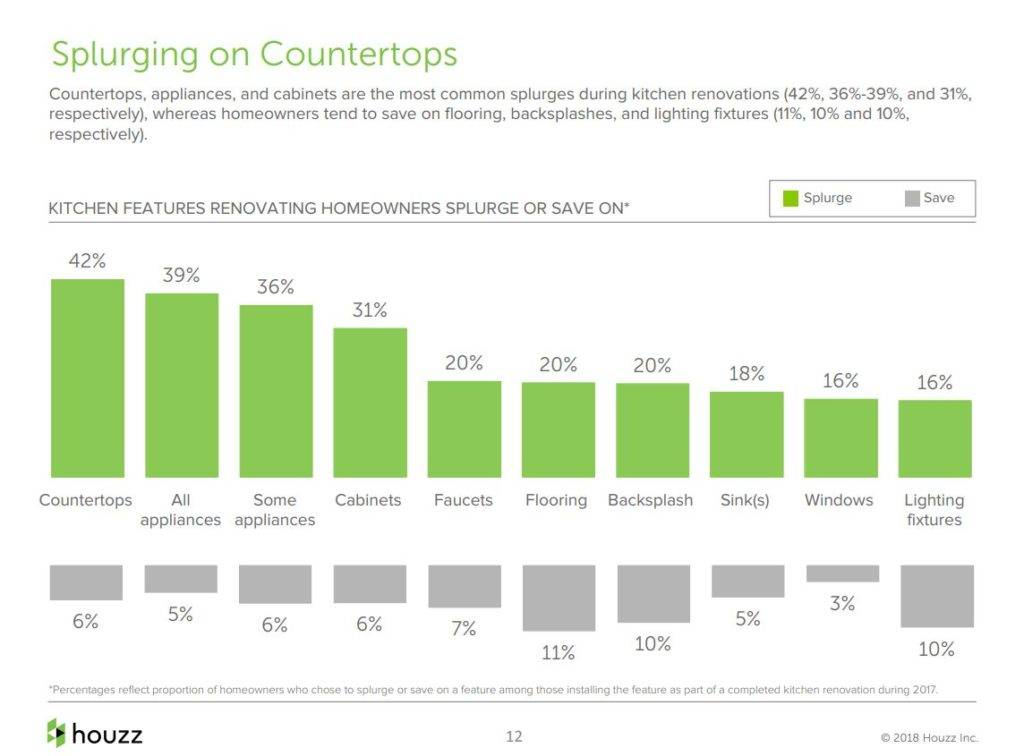
From a 2019 survey on Houzz: White countertops continue to grow in popularity. Nearly one in three counters are done in white (22%, 27% and 31% in 2017, 2018 and 2019 studies, respectively) making them the #1 countertop choice for homes.
White glass is much harder on the Mohs hardness scale (7) vs glass (5.5) or granite (6.2) or engineered quartz (6.7). It is a superior countertop material for outdoors as it reflects much of the solar energy, is UV-proof, non-porous, stain-proof, requires zero maintenance or sealing, and does not burn from cigarettes. White glass comes in slabs 120” x 60” x 1.2”
Black Glass countertops are similar to White glass…but a deep, pure opaque high gloss black. These will get hot in direct sunlight.
Recycled Glass Countertops is a matrix made up of small chips of colorful recycled glass chips in a binder and sold in slabs. A concrete based binder for your recycled glass countertops will require a sealant application. A resin-based binder will stand up to stains better, but can’t be used outdoors…UV light will degrade it. Many choices for colors and binders are available. Vetrazzo, IceStone, Geos are notable brands.
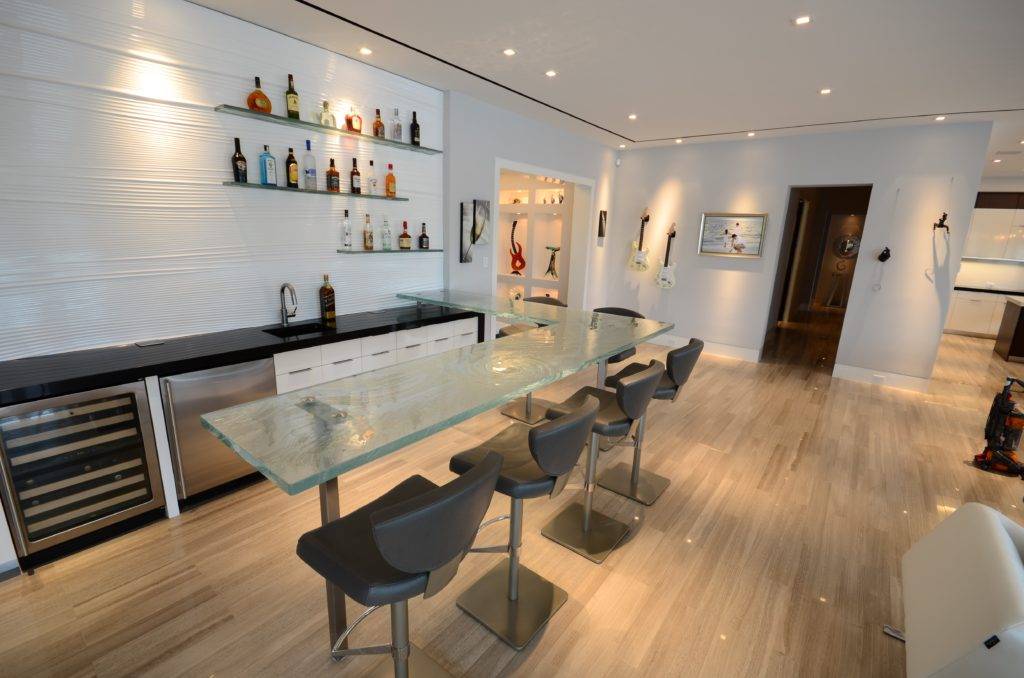
Textures for Glass Countertops
Texturing Glass Upon selection of the glass countertop to be used, fabrication can begin after measuring, templating, and texture design. A like a bespoke tailor, a full-service glass countertop designer-fabricator will demonstrate ALL of your options to accessorize your glass countertop to achieve the utmost in “wow” factor. These critical points include:
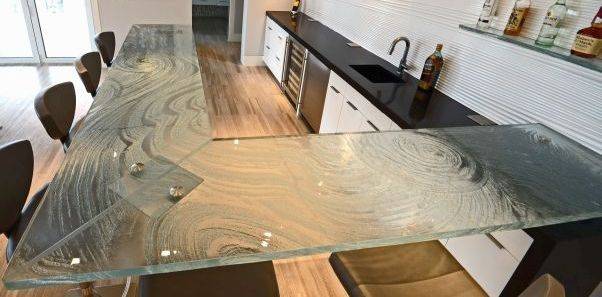
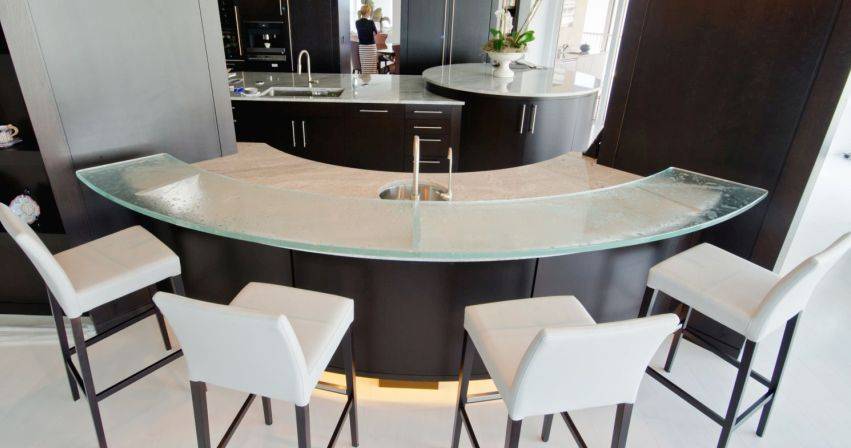
Stamped Textures provide a consistent textured look that is omni-directional. These can be interesting when selected for the right environment.
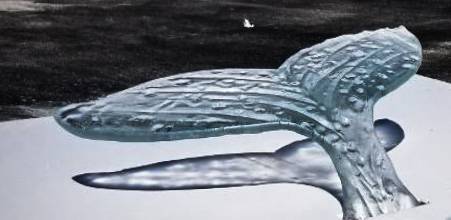
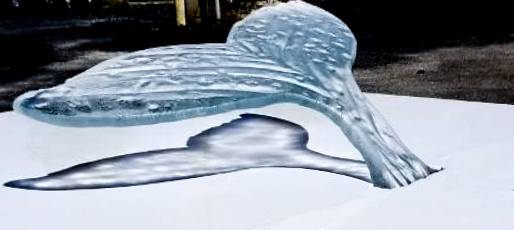
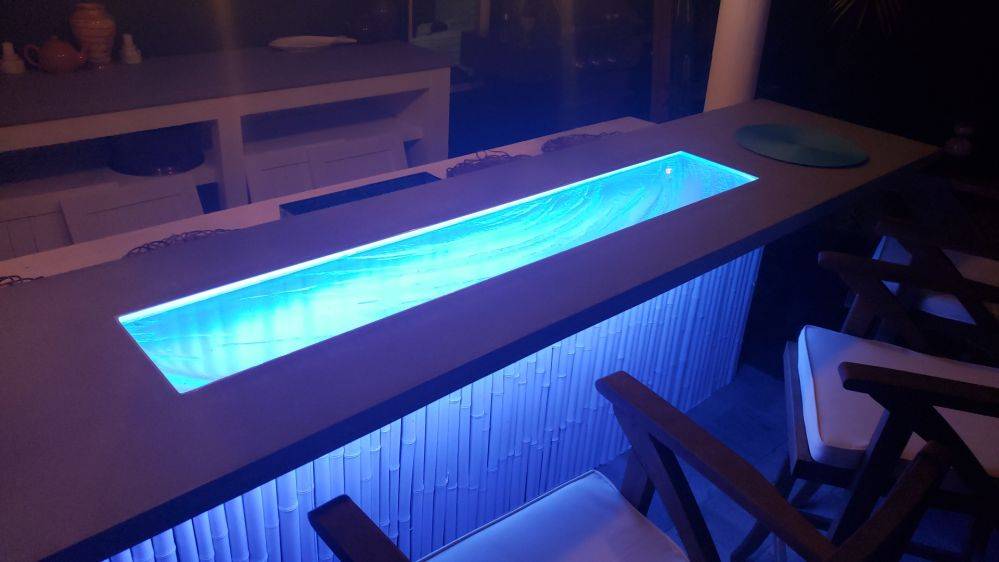
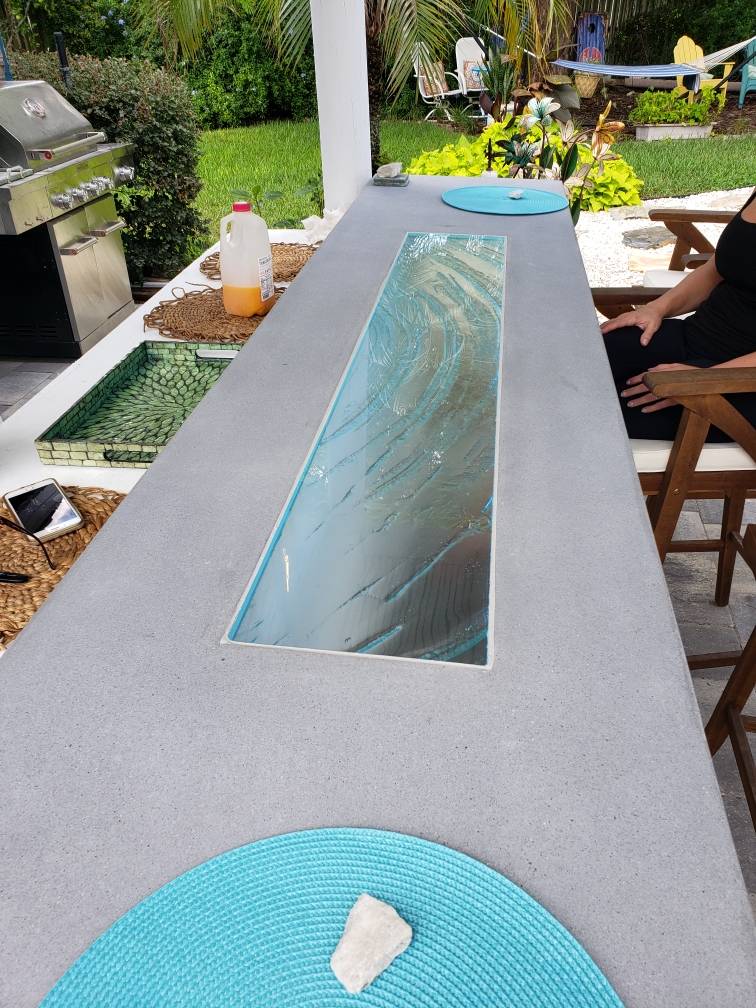
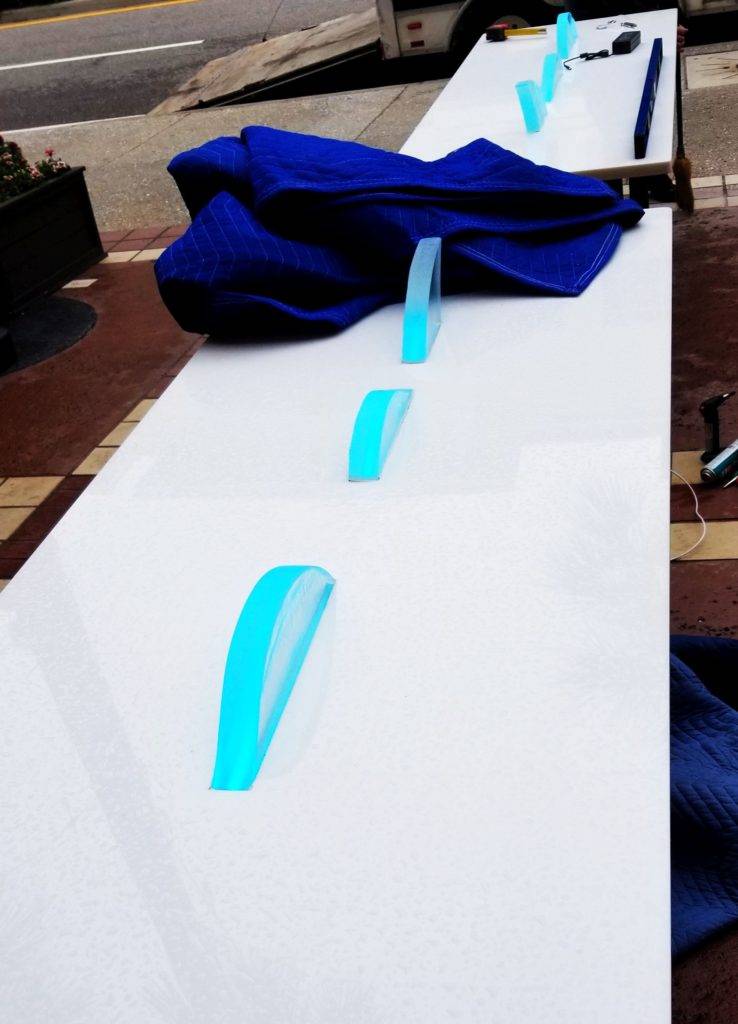
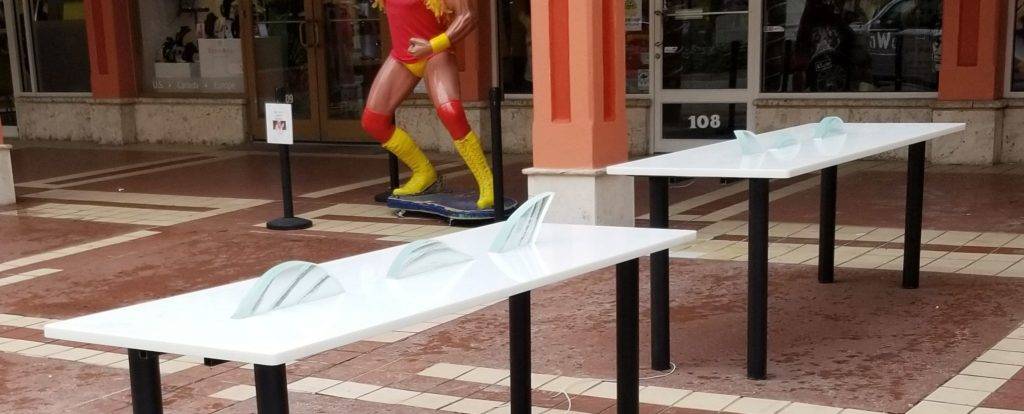
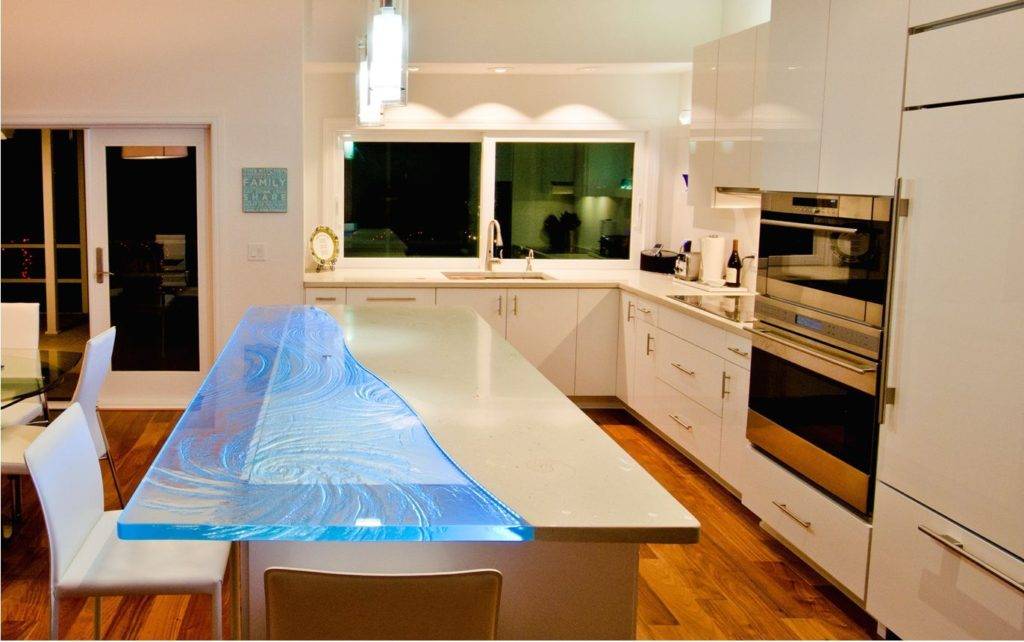
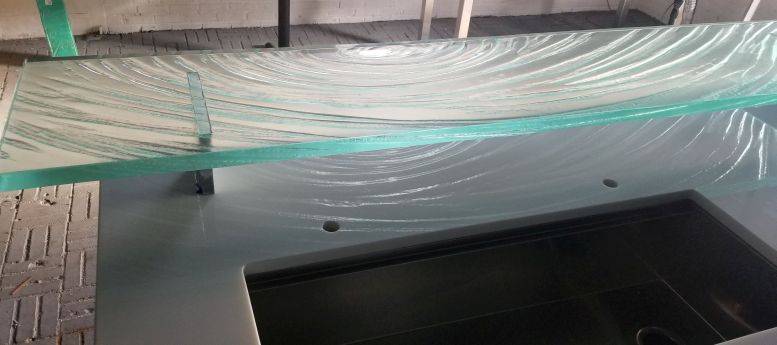
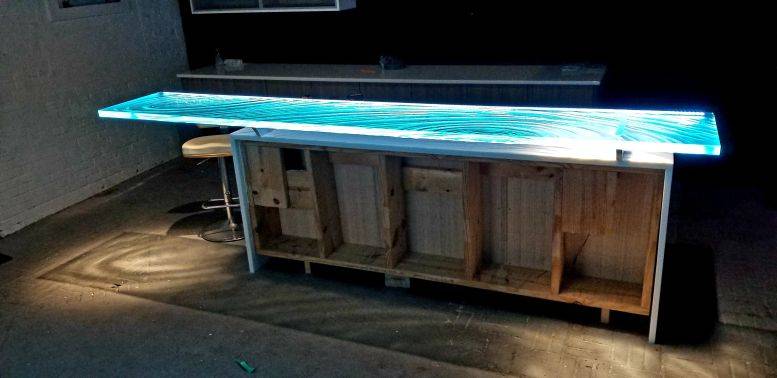
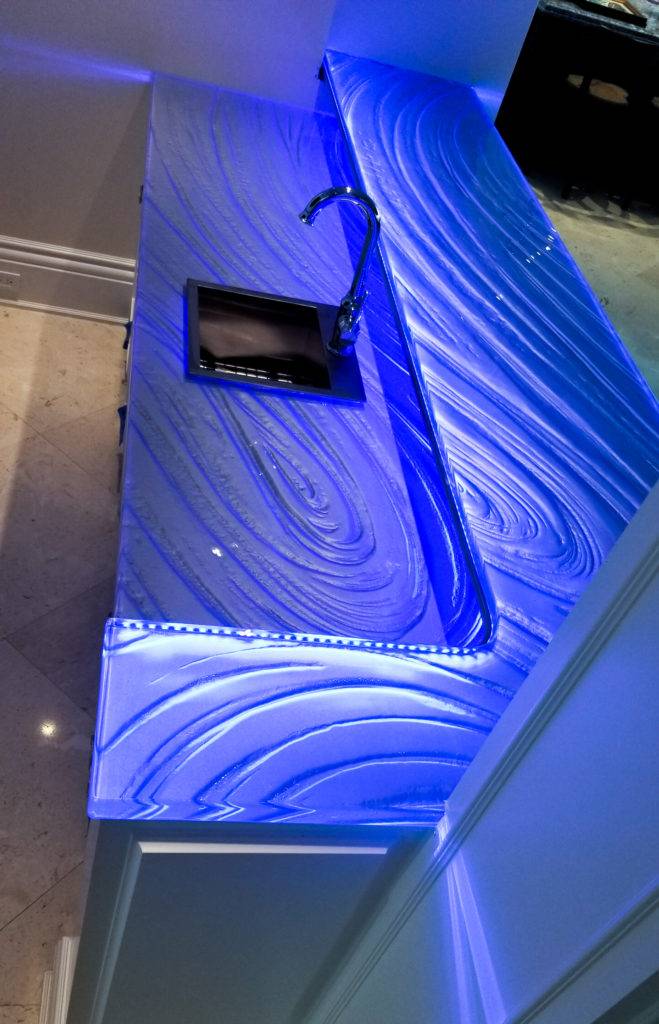
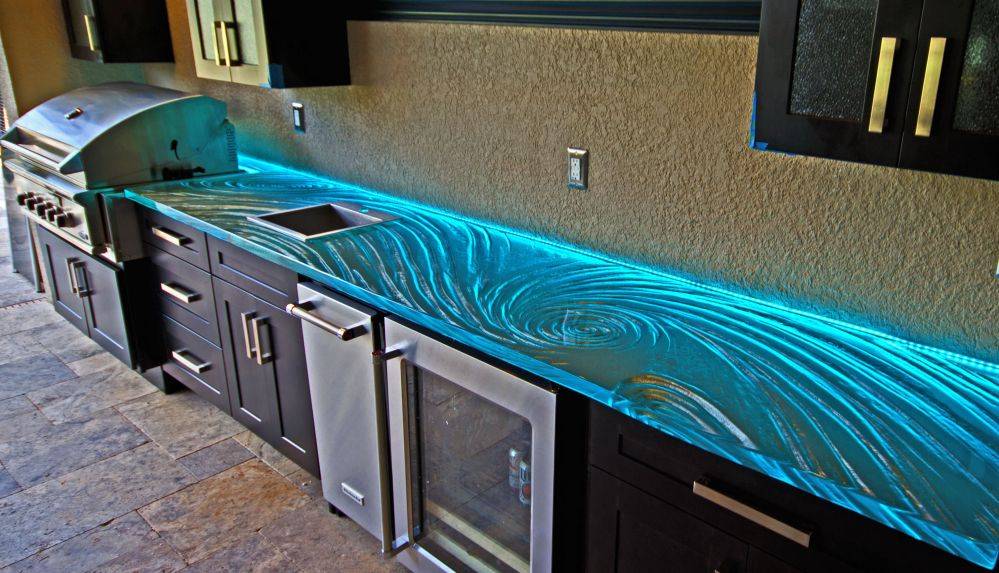
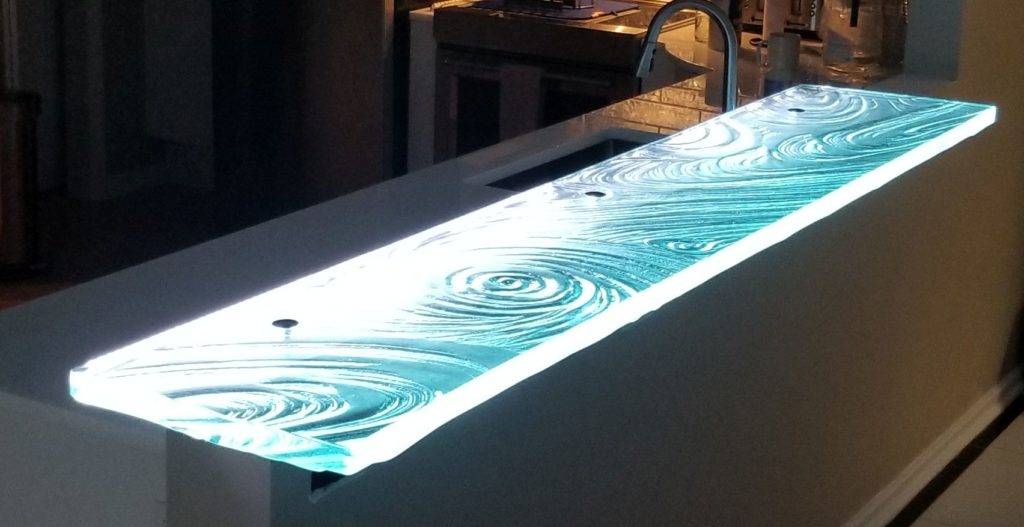
Hand Sculpted Textures are artistically carved into the kiln bed to create the texture you desire. Deep textures create drama and are spectacular when lit with LEDs and downlights.
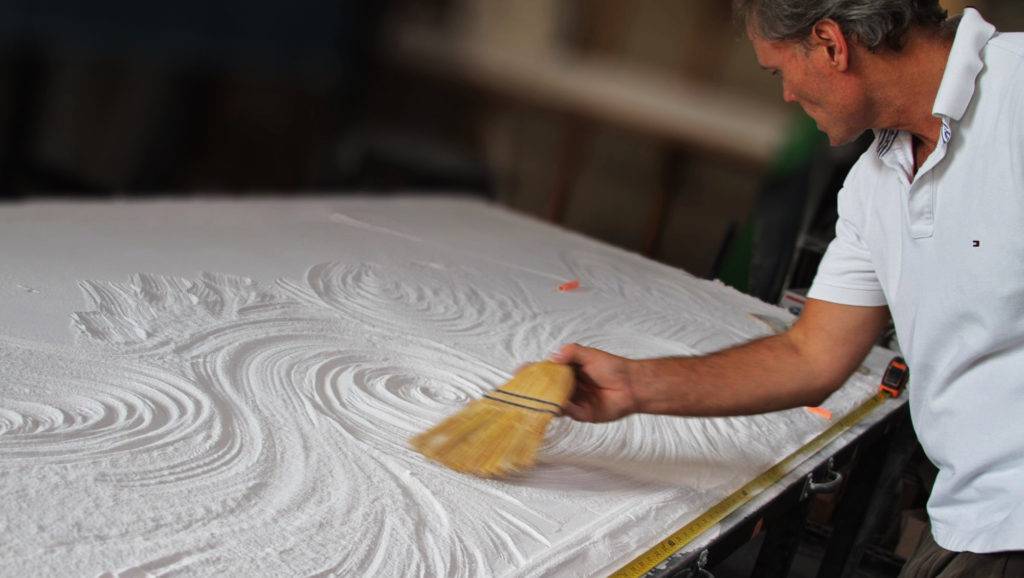
Hand Texturing Kiln Bed fro Glass Countertops
Designer Tip: Communicate and review pattern suggestions, and refine these until happy. Select a glass texture that enhances the personality of your room “flow”. Don’t settle for a stamped textured piece of glass when for the same amount of money you can have a custom designed statement piece that flows elegantly with the lines in your home. Make sure your texture flows from one piece of glass to another across the seam in multi-sectional countertops.
Air Bubbles trapped between layers of glass are part of their endearing “flaws” since glass is not formed under a vacuum.
They enhance the visual interest and depth of thick glass countertops. More Bubbles can be creatively added to glass countertops (with chemicals) if that is your desire.
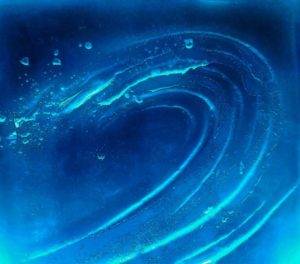
Cresting Wave with Bubbles Included
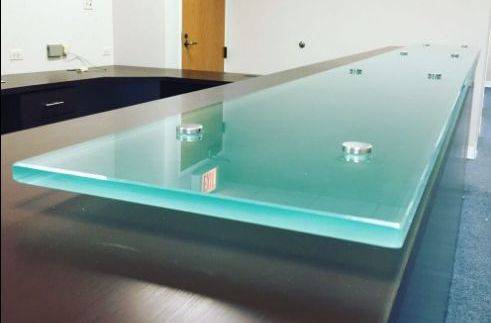
Glass Cutting and Polishing
Kiln-formed glass must be cut to size and have holes drilled. Waterjets, wet saws and polishing tools with plenty of water are used. Make sure your glass fabricator has these in his shop to efficiently move your glass from kiln to cutting to polishing.
Designer Note: Make sure you inspect the quality of the edge polish of your glass countertop upon arrival. If it has lines from a worn out CNC bit, reject it! Your glass edge should offer a perfectly polished lens into your glass.
Lines on Face due to Worn Out CNC bit…”Shiney but Liney”
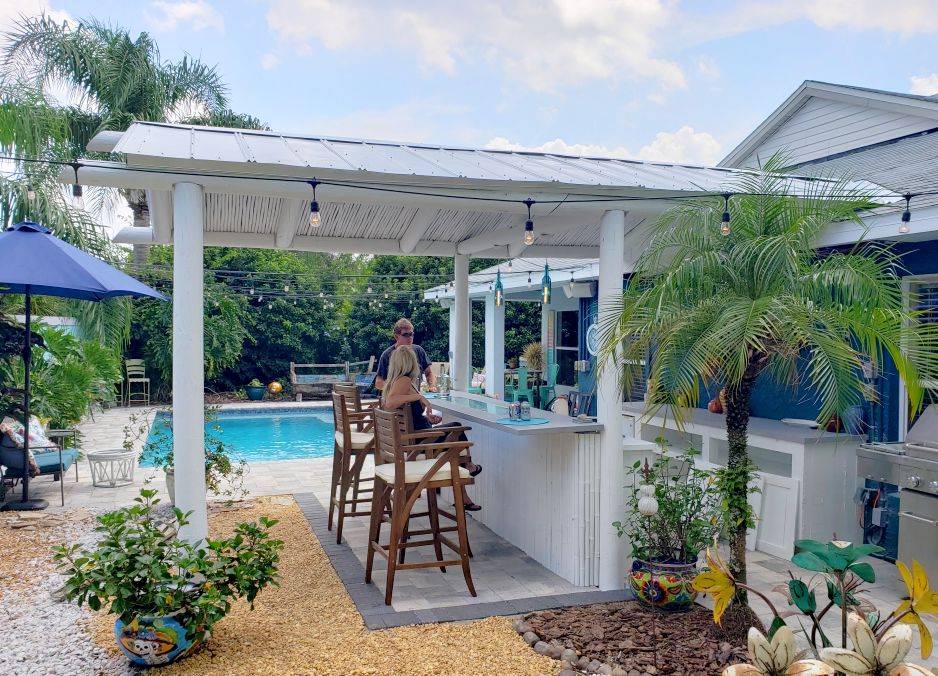
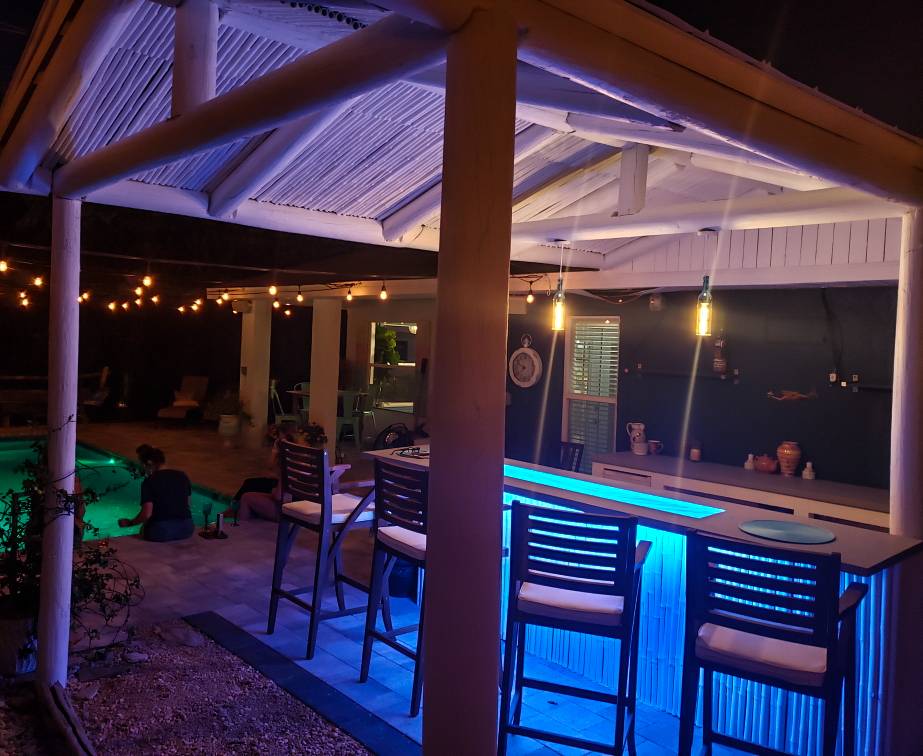
Lighting Glass
Make sure you have a thorough Lighting plan for LED Edge Lighting, Down lighting and Ambient Lighting so they can all contribute to the WOW factor of your glass countertop.
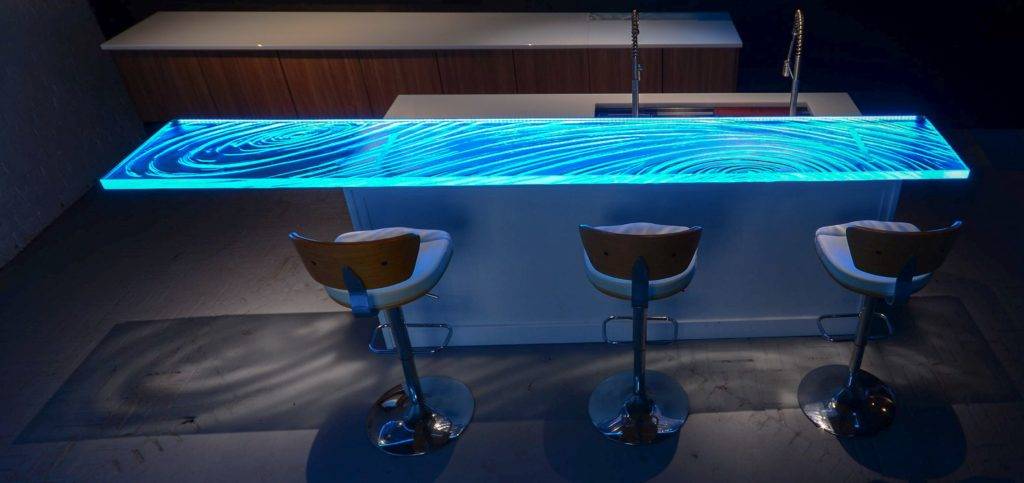
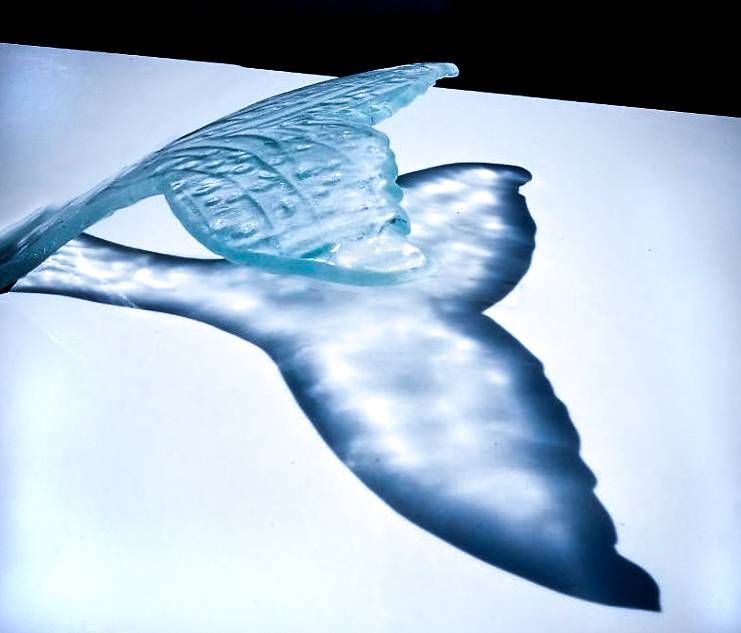
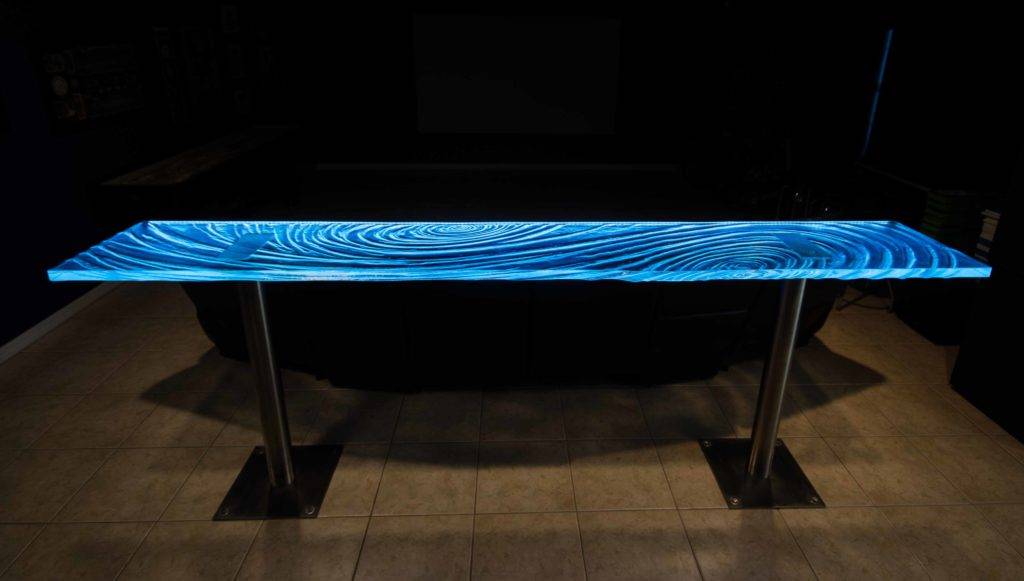
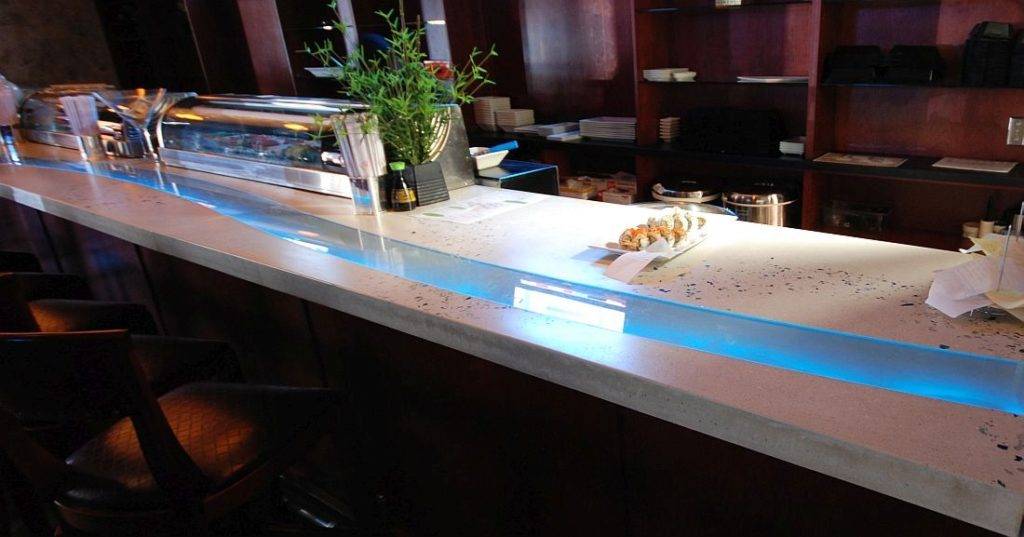
LED Edge and Down lighted Glass Countertop…Note Dramatic Shadows on Floor
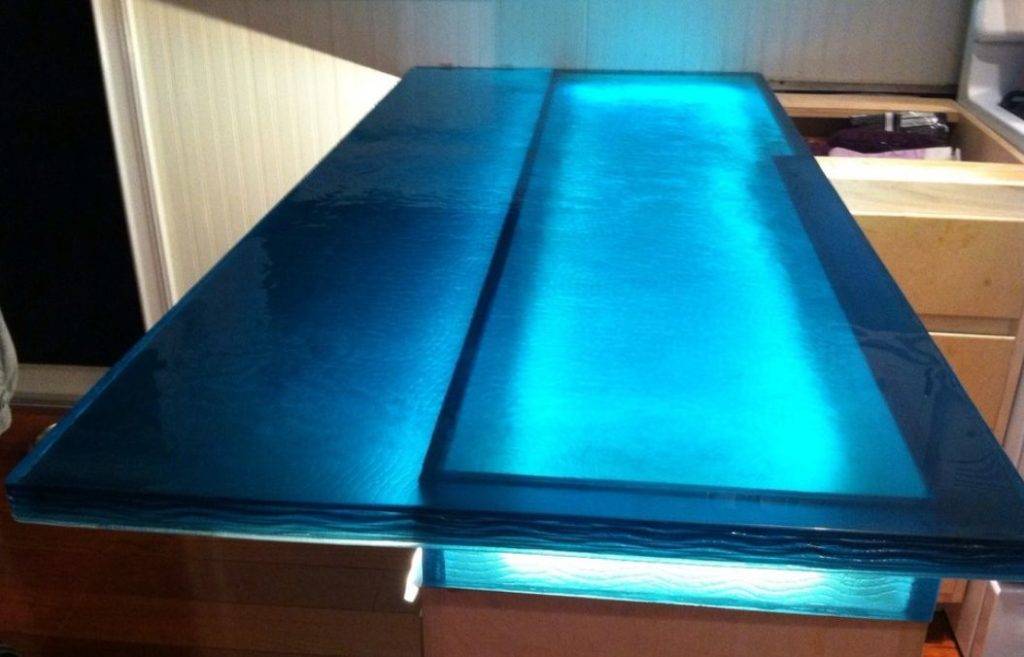
LED Edge Lighting is typically this is the best way to light textured glass countertops. Narrow LED strip lights on the edge of the countertop allow for high levels of striking high-contrast color. Done right, your glass countertop will “POP”…especially at night. Color and brightness are achieved with a controller, usually a smart phone app. This produces millions of stunning colors that can even dance to your music. You will need to run wires from the LED strips to a controller and transformer to a 110v power outlet. Use quality LEDs…this is not a place to save money as they can be tricky to replace once installed.
- Designer Tip: Your LED cover and wiring should be minimalist and allow viewing into glass as well as reduce the pixel appearance from the front. Get a plan to conceal the LED wires through the supports and lower surface.
Minimalist LED Cover…no Visible Wires.
On A Lighter Side Note: Our “proprietary” research shows that properly lit Glass High Bars are in fact “Time Machines”. Apparently, a huge benefit of the upward angling and soft mood lighting from our glass high bars is that it “turns back the clock a few years”. (It makes my vintage 1959 wrinkles almost go away…we are not sure how to price that benefit just yet).
Down lighting from the ceiling will create a powerful mimic shadow upon the floor and lower surface. It is a perfect lighting technique for High bars to complement LED edge lighting.
Designer Tip: Modern LED downlights are available that create a tight, well-defined X-Ray shadow upon the floor. They are powerful, dimmable and consume very little electricity. Aim the light to project the shadows where you desire…preferably at an angle to make the shadows look bigger.
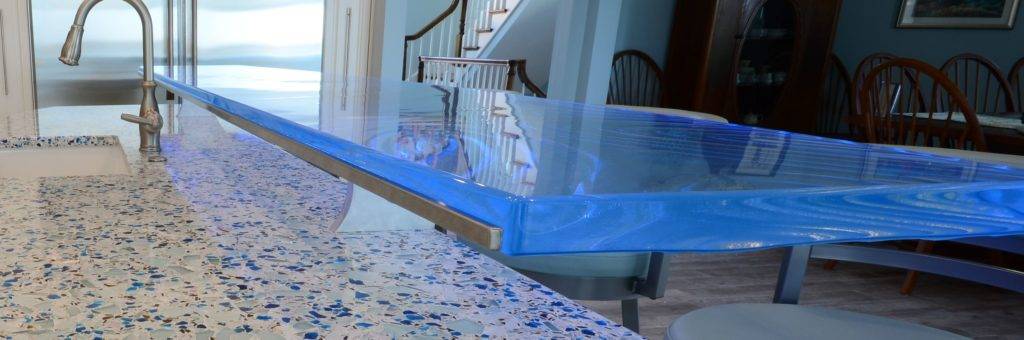
Ambient lighting allows the glass to pop naturally during the day in a sunny location. Low iron glass is naturally beautiful when lit with sunlight.
Glass Countertop without LED in Daylight
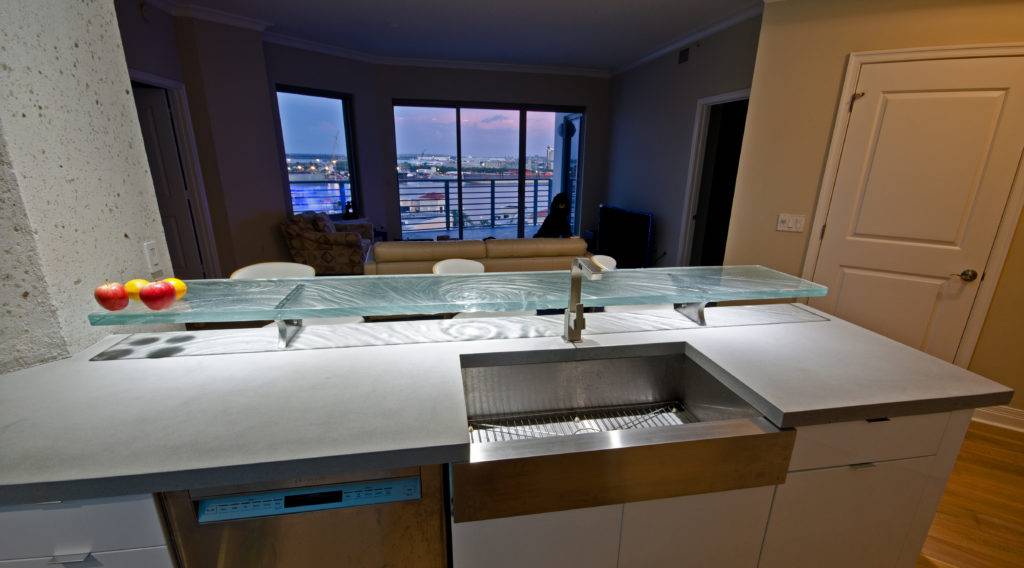
Same Countertop Down lit at Night
Under lighting Glass requires a tall structure on the underside of the textured glass to allow for even distribution of light…which may be unsuitably high for your countertop.
- Designer Note: It also creates a very “flat” lighting effect that minimizes the contrast of shadow vs light and robs textures of their visual depth. It “highlights” the rib structure of the underlying panels…and is not pretty. (see below). This technique does however work well with onyx slabs.
Underlit Glass Countertop…Looks like an XRay!
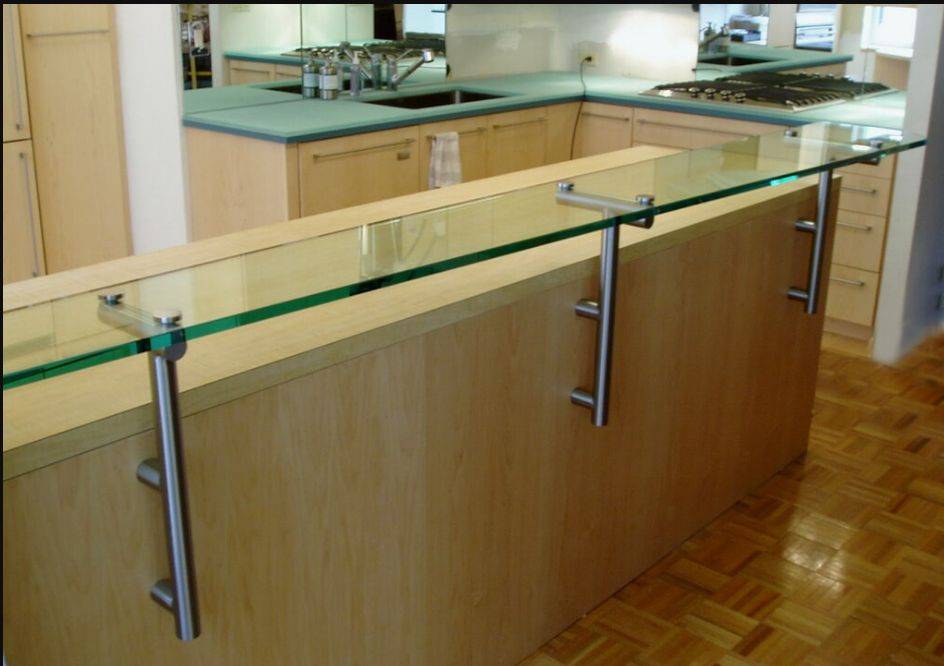
Metal Support Brackets and Installation Techniques
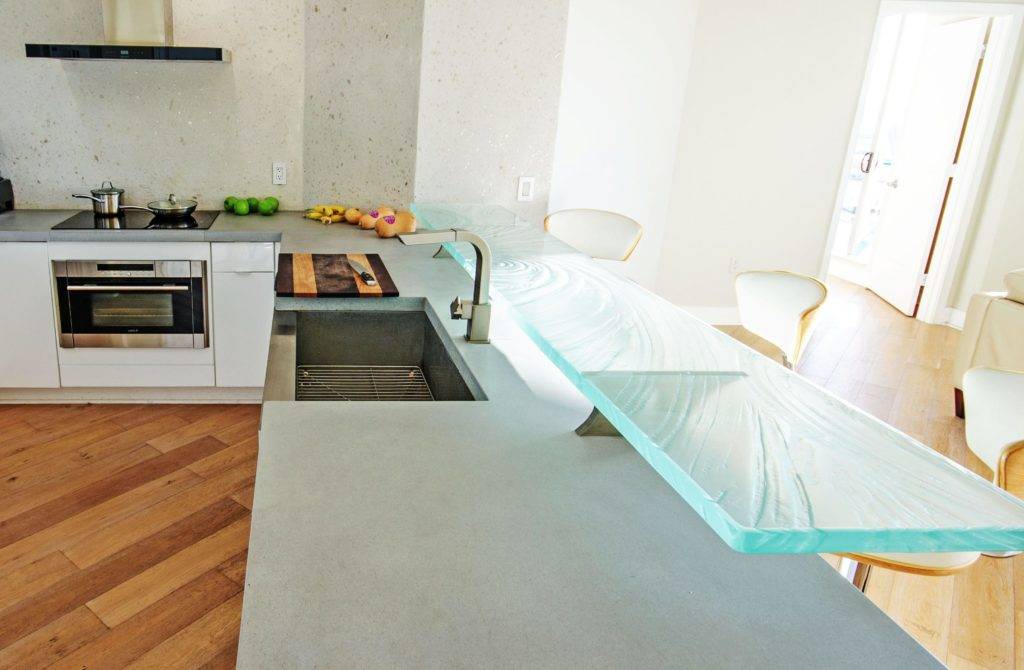
Supports Metal support brackets of all shapes and sizes are available.Custom metal supports must often be fabricated to suit unusual installs e.g floor-mounted supports. Your metal fabricator should be able to offer you any design you wish. Make sure your plan for your high bar is sturdy and elegant. Methods of attachment of the glass to the support include:
- Silicone. Best used to attach textured glass to flat supports.
- Metal Caps. Low Profile caps are best if caps are used.
- UV glue. Fastest bond for flat glass to flat metal supports.
High Bar with (3) Low Profile Caps, No supports
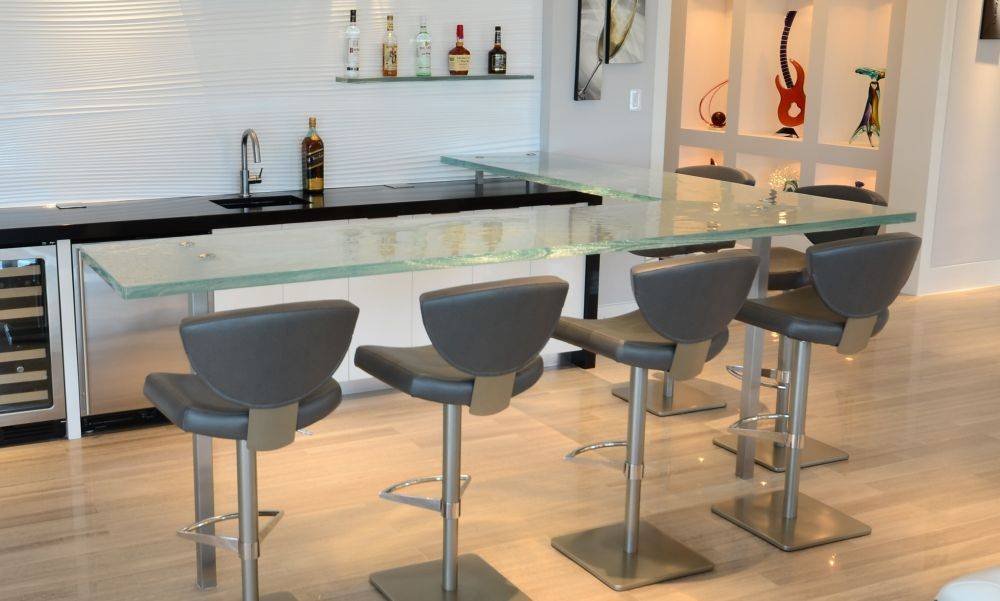
High Bar with Low Profile Caps, Stainless Supports in Ground.
High Bar with Custom Supports…attached by Silicone
Designer tip: Many designs are lazy and use ill-conceived support techniques. They often prevent you from freely rotating in your high bars stools because your knee hits the support. Or, they use “hockey puck caps” on top of the glass to prevent you from having an uninterrupted smooth flow across your high bar surface. Look for these “beauties” in the “Errata” section at the end of this article. Make sure your supports do not interact with your knees at your glass high bar.
Back painting glass maximizes the visual depth of the textured glass countertop, backsplash or sink basin, while hiding the ability to see under or behind the glass.
- Designer Tip: Back painting is preferred to laminating or painting your underlayment because gnats can find their way between the bottom of textured glass and the top of the laminate where their little carcasses will pepper the background forever. Not Pretty. Silver metallic and white back paint add depth. Back paint can be tinted to match your decor.
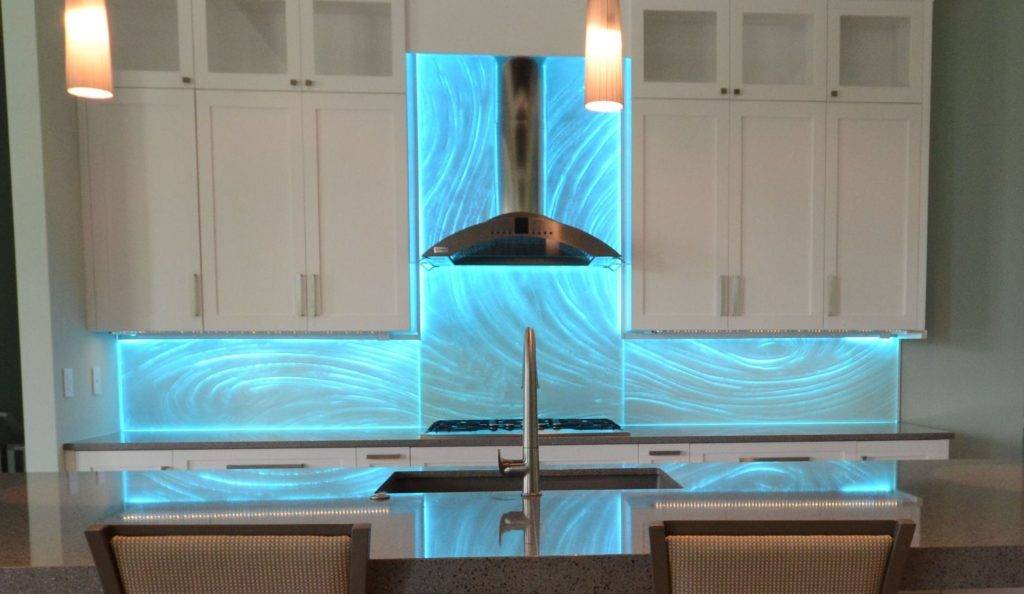
Textured 1/2″ Glass Backsplash Backpainted with LEDs
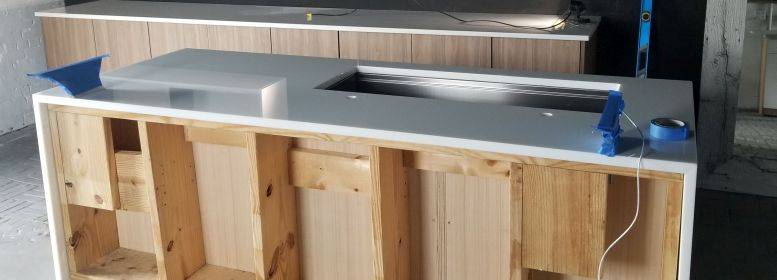
Installation and Shipping.
Expensive Glass requires skillful planning and experienced manpower to install.
- Designer Note: We have been on a few time critical installations where cabinets, plumbing, electrical work, ceiling plastering were all being dome in the same kitchen at the same time! This is not good.
Please have a schedule that allows the glass counter to be one of the last installations...just like a valuable piece of wall art. Having too many tradesman in the room after installation increases the risk of damage to your artistic piece.
Crating for Shipping. Crates are specially fabricated for glass countertops with plenty of sturdy foam to cushion it during shipping. Make sure you purchase insurance t cover the cost of both the glass as well as the shipping costs.
Solid Crate for Shipping Glass Counters
Glass Countertops Cost:
As you can see, there is a wide range of options for glass countertops. It is impossible to conclude a precise cost but these numbers below can give you a start.
- $100+/sq. ft. for ¾” flat low-iron glass. Backpaint, thermoforming, waterjetting custom shapes, holes, etc. adds to cost.
- $350+/sq. ft. for 1.5” textured low-iron glass. LEDs, backpaint, custom shapes, size of piece, supports, installation, etc. add to cost.
- White Glass and Recycled Glass are $125-175+/sq. Ft.
- Installation and delivery costs add to the above.
Remodeling Trends
In an interesting article on Houzz, they show that homeowners are increasing their spending more on High-End countertops vs other kitchen elements.
Houzz Survey…Buyers are Splurging on Countertops
Conclusion
You are going to have to place your trust and money in someone to faithfully execute your glass countertop project. If your vendor cannot confidently lead you through each step in the design, template, custom textural sculpting, fabrication, lighting, back-painting, supporting, securing, shipping as well as installing, then find one who can …or…risk a poor outcome. Glass counters cost too much to risk a poor outcome.
Find a passionate glass fabricator that can listen to you and bring out the best in your ideas, create a plan and lead you through the process. The result will be an unbelievable artistic “wow” piece in your home.
Jeff Downing is the founder of Downing Designs in Downtown Tampa, FL. He has represented Hewlett-Packard and Philips Medical amongst others before quitting to open his custom design studio. His teachings and blogs help architects, designers, etc. to embrace creative new ways to use glass in their projects. He previously represented ThinkGlass for several years before purchasing his owns kilns to bring his unique artistic glass visions to life.
ERRATA
STRANGE Glass statements we have scraped from the Internet…”Fake News”
“On average, the minimum cost for glass countertops per square foot is $75, while the maximum cost per square foot is around $105.”
Clearly they have never made a thick textured glass countertop.
“Annealed Glass—Similar to tempered glass, annealed glass has chemicals added to the resin mixture to increase its strength.”
A chemical added to the resin??? This is glass, NOT plastic.
“Nonetheless, there are many other factors that can increase or decrease the total cost of glass counters. Supplies such as sealants and adhesives add an average of $2.45 per finished square foot of surface area.”
Sealants???? Why do you need to seal glass? Its non-porous.
“Contact with acidic foods, drinks, and certain cleaners can affect the surface and require fixing”
Not unless you are serving hydrofluoric acid to your guests! Nonsense!
Odd Designs Ideas for High Bars
Underlit Glass Countertop…Looks like an XRay!
This ugly underlighting completely ruins an otherwise nice glass countertop. Very Odd looking.
Glass Countertop with Hockey Pucks and Archaic supportsWhere am I supposed to sit ? Knee and Shin bashing will occur. Careful of those Hockey Pucks! I think Ill stand.

Glass Countertop with Hockey Pucks and Intrusive supports
Again, where am I supposed to sit? Knee bashing will occur. Shins are safe here. Robs the ability to seat people normally.

Glass Countertop with fat supports and LED covers
Where does my glass of wine and dinner plate sit? Look out for those hockey pucks! Would the Chef like to see the edge of the glass on the backside while cooking? No Chance! Glass Counters should look great from all sides.
What is the Point? No Cantilever, Lots of Hockey Pucks,No room to clean under.
Lots of hockey pucks, and fat under side supports in an otherwise beautiful glass piece.
The post 2019 Buyers Guide to Glass Countertops …Written by an Experienced Glass Fabricator appeared first on Downing Designs.
source
https://downingdesigns.com/glass-countertops-buyers-guide/